Flyway 是一套開源數據庫遷移工具,能夠做到資料庫的版本管理,並即時的完成資料遷移作業。
本文將在 20 分鐘內,透過 2 個觀念建立、3 個實際用例,帶你明白 Flyway 是什麼,並彙整 3 步驟實踐資料庫版控、4 步驟立即導入既有專案中。
本文架構

首先,為何需要資料庫遷移?
在 Flyway 中,任何對資料庫進行的異動都稱為 Migration(遷移)
在開發新專案、維護既有系統、處理各式 CR 的開發週期中,面對各種不同狀況,勢必會變更到資料庫的設計,例如: 異動欄位、索引變更等等…
而上述這些異動也都將由不同的開發人員進行,通常會需要將異動統一進行維護,以利開發週期各個階段執行。
在實務上,不同開發人員、多個環境,此時手動執行資料庫的異動將可能出現如下狀況
- 線上問題修復的資料庫異動沒有同步到各個測試環境
- 更新版本尚未預先執行異動腳本導致出錯
- 異動腳本指令錯誤並未被及時發現
要減少上述問題,我們希望能夠實現下列事項:
- 有效追蹤資料庫異動歷程。
- 各個環境的資料庫異動不必手動執行,降低錯誤率。
- 每次程式進行更版時能夠立即執行 DDL & DML 變更。
為了達到上述目標,我們將使用 Flyway 來替我們實現。
Flyway 資料庫遷移運作方式?
❖ 基本運作原理
❶ 透過歷史紀錄表 (flyway_schema_history) 紀錄每一次的資料庫異動
Flyway 首先會檢查資料庫使否有此紀錄表 (flyway_schema_history) ,若沒有則會優先建立此表,接著針對需要被執行的 SQL 檔案,會先計算出 checksum 作為驗證,於每次 Flyway 啟動時根據 checksum 驗證資料庫是否需要被更改。
備註:checksum 計算採用 crc-32 checksum。
❷ 透過 SQL 或 Java 編寫 DDL/DML,並定義其版號使 Flyway 進行掃描並執行
Flyway 將可設定執行順序,預設依據版號進行排序執行,並且寫入歷史紀錄表 (flyway_schema_history) ,Flyway 提供多種 Migration 的方式,以下將針對 Migration 的類型、實作做更詳細的介紹。
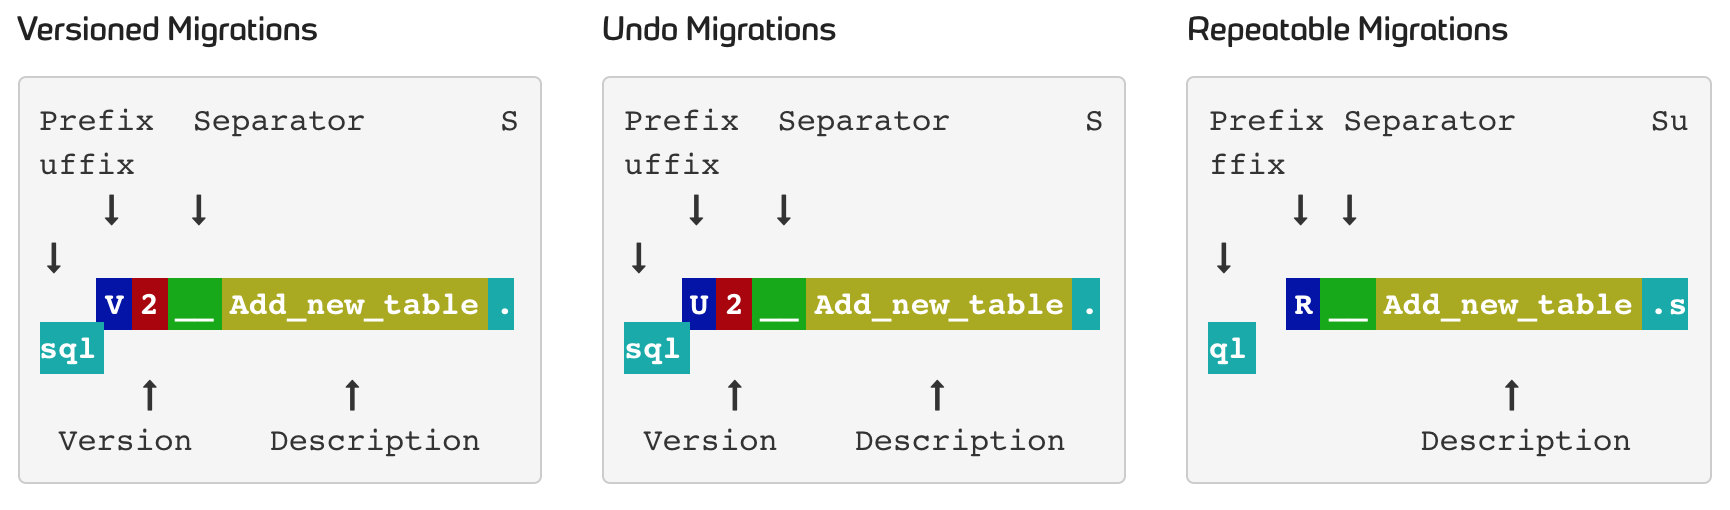
❖ 遷移的類型
❶ Versioned Migrations(版本遷移)
用於創建、更新、刪除:表、索引、外鍵。
❷ Undo Migrations(撤銷遷移)
即為 Versioned Migratios 的回滾機制。
❸ Repeatable Migrations(重複遷移)
用於建立 views/procedures/functions/packages/…以及批次寫入特定數據。
❖ 遷移的實作
❶ SQL-based migrations
這是最常使用也最便利的實作方式,主要用於實作 DDL 的變更及簡單的資料異動。
命名規則: (擷取官方圖片)
❷ Java-based migrations
實作情境用於 BLOB & CLOB 的變更以及較為複雜的資料異動。
類別命名規則: (擷取官方圖片)
❸ Script migrations
目前官方支援 .ps1, .bat, .cmd, .sh, .bash, .py 的腳本撰寫,其命名方式與 SQL-based migrations 相同,只差在腳本的副檔名不同。
如何開始使用 Flyway ?
瞭解基本 Flyway 的 Migration 類型與實作種類,接著我將以 Spring Boot 與測試框架 TestContainers 進行實務上開發與測試的說明。
❖ 實作一. 搭配 Spring Boot
以下三步驟即完成 Flyway 基於 Spring Boot 的實際用例配置
❶ Maven 配置
<properties>
    <java.version>11</java.version>
    <testcontainers.version>1.15.2</testcontainers.version>
</properties>
<dependencies>
    <!--Spring-->
    <dependency>
        <groupId>org.springframework.boot</groupId>
        <artifactId>spring-boot-starter</artifactId>
    </dependency>
    <dependency>
        <groupId>org.springframework.boot</groupId>
        <artifactId>spring-boot-starter-web</artifactId>
    </dependency>

    <!--Logger-->
    <dependency>
        <groupId>org.springframework.boot</groupId>
        <artifactId>spring-boot-starter-logging</artifactId>
    </dependency>

    <!--Database-->
    <dependency>
        <groupId>org.springframework.boot</groupId>
        <artifactId>spring-boot-starter-data-jpa</artifactId>
    </dependency>
    <dependency>
        <groupId>mysql</groupId>
        <artifactId>mysql-connector-java</artifactId>
        <version>8.0.23</version>
    </dependency>
    <dependency>
        <groupId>org.springframework.boot</groupId>
        <artifactId>spring-boot-starter-jdbc</artifactId>
    </dependency>

    <!--Flyway-->
    <dependency>
        <groupId>org.flywaydb</groupId>
        <artifactId>flyway-core</artifactId>
        <version>6.5.7</version>
    </dependency>

    <!--Testing-->
    <dependency>
        <groupId>org.springframework.boot</groupId>
        <artifactId>spring-boot-starter-test</artifactId>
        <scope>test</scope>
    </dependency>
    <dependency>
        <groupId>org.testcontainers</groupId>
        <artifactId>junit-jupiter</artifactId>
        <scope>test</scope>
    </dependency>
    <dependency>
        <groupId>org.testcontainers</groupId>
        <artifactId>mysql</artifactId>
        <scope>test</scope>
    </dependency>

</dependencies>
<dependencyManagement>
    <dependencies>
        <dependency>
            <groupId>org.testcontainers</groupId>
            <artifactId>testcontainers-bom</artifactId>
            <version>${testcontainers.version}</version>
            <type>pom</type>
            <scope>import</scope>
        </dependency>
    </dependencies>
</dependencyManagement>
❷ 設定檔配置
# ==============================================================

# = 資料庫設定(非 Testcontainers 資料庫設定)

# ==============================================================

spring.datasource.url=jdbc:mysql://localhost:3307/flyway_db?useUnicode=true&characterEncoding=utf-8&socketTimeout=60000&connectTimeout=30000
spring.datasource.username=flyuser
spring.datasource.password=123456
spring.jpa.show-sql=true
spring.jpa.open-in-view=true
spring.jpa.properties.hibernate.connection.release_mode=AUTO
spring.jpa.hibernate.ddl-auto=validate

#最小空閒連接數
spring.datasource.hikari.minimum-idle=10 #連接池最大大小
spring.datasource.hikari.maximum-pool-size=50 #連接最大空閒時長
spring.datasource.hikari.idle-timeout=60000 #連接生命時長
spring.datasource.hikari.max-lifetime=1800000 #連接的超時時長
spring.datasource.hikari.connection-timeout=30000

## ==============================================================

## FLYWAY 配置

### ==============================================================

spring.flyway.url=jdbc:mysql://localhost:3307/flyway_db?useUnicode=true&characterEncoding=utf-8&socketTimeout=60000&connectTimeout=30000
spring.flyway.user=flyuser
spring.flyway.password=123456
spring.flyway.locations=classpath:doc/migration/common,classpath:db/migration
spring.flyway.table=flyway_schema_history
spring.flyway.baseline-on-migrate=true
spring.flyway.baseline-version=1.0
spring.flyway.out-of-order=true
spring.flyway.validate-on-migrate=true
spring.flyway.enabled=true

# ==============================================================

# = LOGGING

# ==============================================================

logging.level.org.hibernate.SQL=DEBUG
logging.level.org.hibernate.type.descriptor.sql.BasicBinder=TRACE
logging.level.org.flywaydb=debug
logging.level.root=debug
❸ 建置 Migration 檔案(此例使用 SQL & Java)
SQL Base Migration
● V1.0__sql_base_migration_ddl.sql
CREATE TABLE IF NOT EXISTS book_case
(
  id char(36) NOT NULL comment '流水號',
  title varchar(20) NOT NULL comment '書名',
  author varchar(20) NOT NULL comment '作者',
  translator varchar(20) NOT NULL comment '譯者',
  publisher varchar(50) NOT NULL comment '出版社',
  publication_date datetime NOT NULL comment '出版日期',
  create_time datetime NOT NULL comment '創建時間',
  update_time datetime NOT NULL comment '更新時間',
  PRIMARY KEY (id),
  KEY index_createTime (create_time)
)ENGINE=InnoDB DEFAULT CHARSET=utf8mb4 COLLATE=utf8mb4_0900_ai_ci;
● V1.1__sql_base_migration_dml.sql
INSERT INTO book_case (
    id,
    title,
    author,
    translator,
    publisher,
    publication_date,
    create_time,
    update_time)
  VALUES (
    '0157e79c-b2dd-4efe-ad40-320cc94c051e',
    'THE INFINITE GAME',
    'Simon Sinek',
    'Huang Tingmin',
    'Commonwealth Magazine',
    '2020-12-30 00:00:00',
    '2021-04-13 20:55:36',
    '2021-04-13 20:55:36');
Java Base Migration
● R__java_base_migration_sample.java
package db.migration;

import org.flywaydb.core.api.migration.BaseJavaMigration;
import org.flywaydb.core.api.migration.Context;
import org.springframework.jdbc.core.JdbcTemplate;
import org.springframework.jdbc.core.PreparedStatementSetter;

import java.sql.PreparedStatement;
import java.sql.SQLException;
import java.sql.Timestamp;
import java.time.LocalDateTime;
import java.util.UUID;

public class R__uuid_generator extends BaseJavaMigration {

    @Override
    public void migrate(Context context) throws Exception {
        final UUID id = UUID.randomUUID();
        LocalDateTime publishDate = LocalDateTime.of(2020, 12, 30, 0, 0, 0);
        String sql = "INSERT INTO book_case (id, title, author, translator, publisher, publication_date, create_time, update_time) VALUES (?, ?, ?, ?, ?, ?, ?, ?)";

        JdbcTemplate template = new JdbcTemplate(context.getConfiguration().getDataSource());
        template.update(sql, new PreparedStatementSetter() {
            public void setValues(PreparedStatement preparedStatement) throws SQLException {
                preparedStatement.setString(1, id.toString());
                preparedStatement.setString(2, "THE INFINITE GAME");
                preparedStatement.setString(3, "Simon Sinek");
                preparedStatement.setString(4, "Huang Tingmin");
                preparedStatement.setString(5, "Commonwealth Magazine");
                preparedStatement.setTimestamp(6, Timestamp.valueOf(publishDate));
                preparedStatement.setTimestamp(7, Timestamp.valueOf(LocalDateTime.now()));
                preparedStatement.setTimestamp(8, Timestamp.valueOf(LocalDateTime.now()));
            }
        });
    }

}
專案架構以及配置參數說明
● 專案結構 (分別列出 SQL Base Migration & Java Base Migration)
├── pom.xml
├── src
│ ├── main
│ │ ├── java
│ │ │ ├── META-INF
│ │ │ ├── com
│ │ │ │ └── tpisoftware
│ │ │ └── db
│ │ │ └── migration
│ │ │ └── R_java_base_migration_sample.java
│ │ └── resources
│ │ ├── doc
│ │ │ ├── migration
│ │ │ │ └── common
│ │ │ │ ├── V1.0_sql_base_migration_ddl.sql
│ │ │ │ ├── V1.1_sql_base_migration_dml.sql
● 配置參數概述
◆ 連線配置
與 datasource 配置相同,當 Application 啟動時,flyway 將會進行連線,並執行 migration
‣ spring.flyway.url
‣ spring.flyway.user
‣ spring.flyway.password

◆ 檔案存取位置
可接受多個參數(請用逗號分隔),指定 flyway 讀取執行 migration 的路徑
‣ spring.flyway.locations

◆ 歷史紀錄表定義
Flyway 歷史紀錄表預設命名為 flyway_schema_history,若有需要可以更改名稱
‣ spring.flyway.table

◆ 是否執行起始版號
當資料庫不為空,是否要執行起始版本,並建立歷史紀錄表,預設為 false,如果並非在專案一開始就導入 flyway,就需要設定為 true
‣ spring.flyway.baseline-on-migrate

◆ 起始版本設定
設定 migration 的起始版號
‣ spring.flyway.baseline-version

◆ 執行 migration 是否允許無序執行
‣ spring.flyway.out-of-order

◆ 執行 migration 是否自動驗證
‣ spring.flyway.validate-on-migrate

◆ 是否啟用 Flyway
‣ spring.flyway.enabled
❖ 實作二. 搭配測試框架 TestContainers 的驗證
以下說明 Flyway 基於 Spring Boot Test With TestContainers 的測試驗證。
❶ 容器化測試基本建立方式可以點選此查閱此篇文章,有詳細介紹容器化測試框架,此文不贅述。
❷ 動態載入 datasource 參數,指定給 flyway 的連線配置(與 spring datasource 相同)
/**
 * 動態設定參數
 * @param registry
 */
@DynamicPropertySource
static void mssqlProperties(DynamicPropertyRegistry registry) {
    //mysql properties setting
    registry.add("spring.datasource.driver-class-name", mySQLContainer::getDriverClassName);
    registry.add("spring.datasource.url", () -> mySQLContainer.getJdbcUrl());
    registry.add("spring.datasource.username", mySQLContainer::getUsername);
    registry.add("spring.datasource.password", mySQLContainer::getPassword);

    //flyway properties setting
    registry.add("spring.flyway.url", () -> mySQLContainer.getJdbcUrl());
    registry.add("spring.flyway.user", mySQLContainer::getUsername);
    registry.add("spring.flyway.password", mySQLContainer::getPassword);
    registry.add("spring.flyway.enabled", () -> "true");
}
❸ 完成配置運行 Spring Test 時會進行以下動作:
● TestContainers 啟動本地端的 MySQL Container

● Flyway 進行驗證

● Flyway 執行 Migration

● 運行測試程式

❖ 實作三. 使用 Maven 運行 Flyway
以下為 Flyway 基於 Maven 的實際用例。
❶ 新增 Maven-Plugin
<plugin>
    <groupId>org.flywaydb</groupId>
    <artifactId>flyway-maven-plugin</artifactId>
    <version>6.5.7</version>
</plugin>
❷ Maven Flyway Configuration 配置
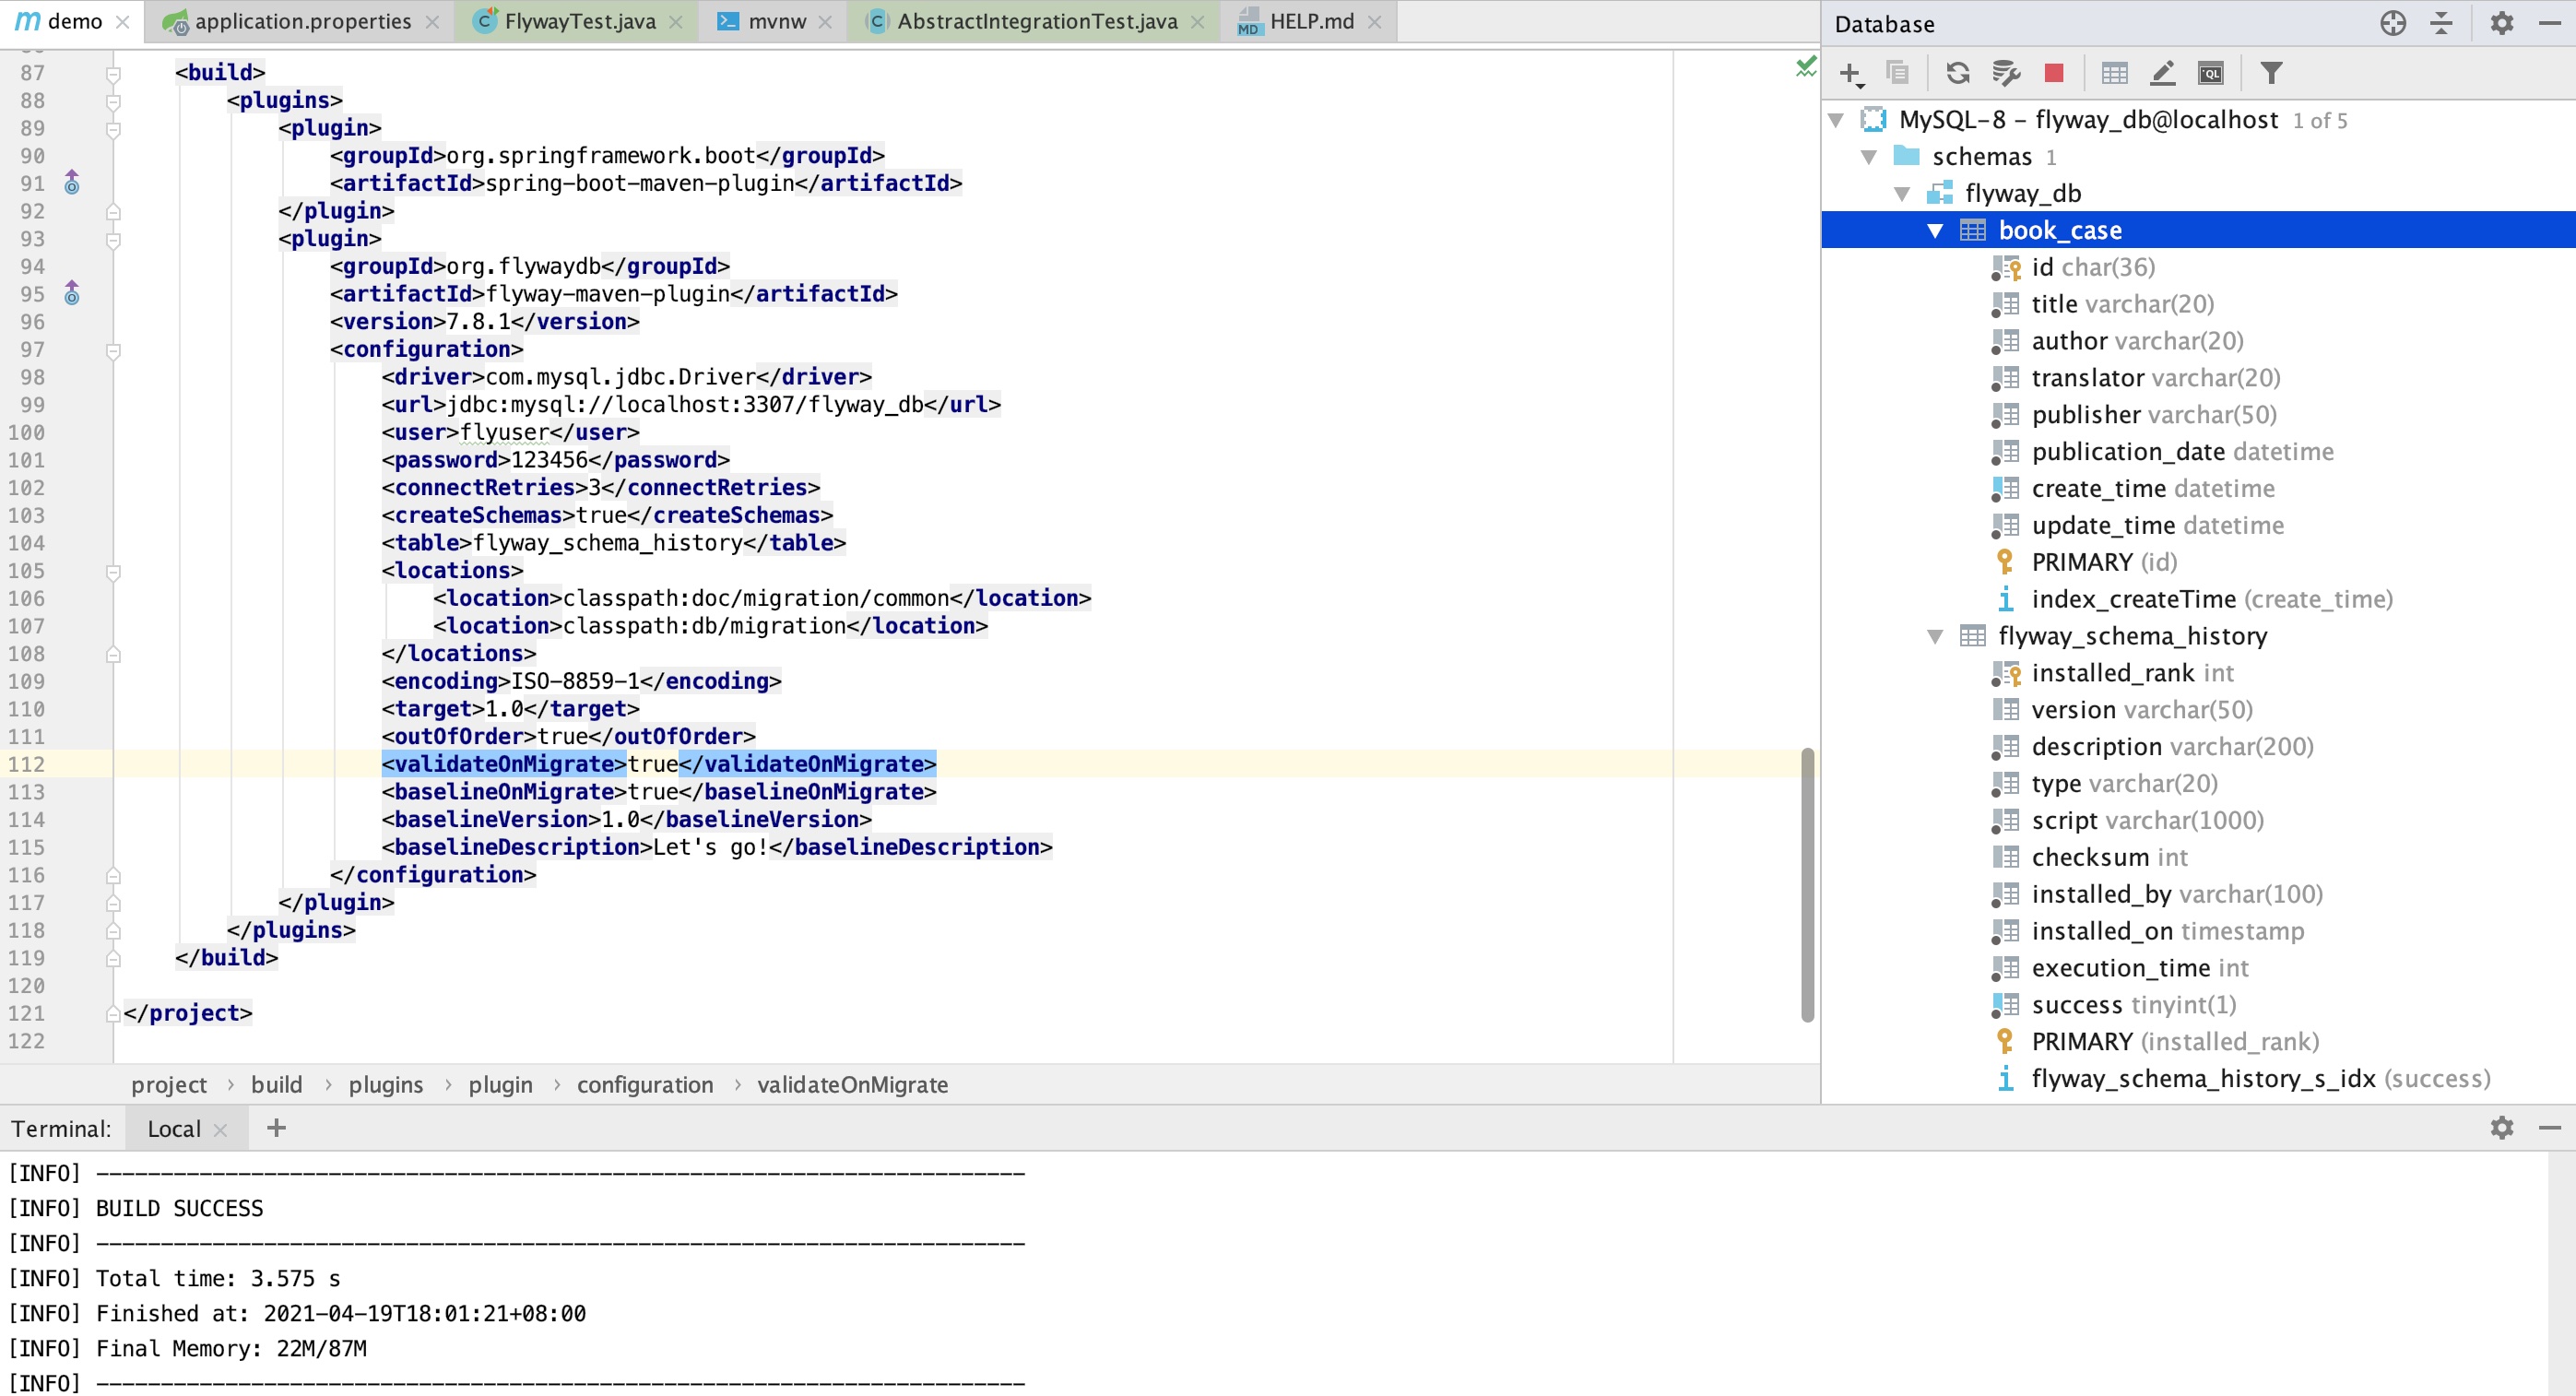
請點選這裡查看資料庫支援及設定說明(本例使用 MySQL,並在本地端啟用 Docker mysql/mysql-server:8.0 作測試)
<configuration>
    <driver>com.mysql.jdbc.Driver</driver>
    <url>jdbc:mysql://localhost:3307/flyway_db</url>
    <user>flyuser</user>
    <password>123456</password>
    <connectRetries>3</connectRetries>
    <createSchemas>true</createSchemas>
    <table>flyway_schema_history</table>
    <locations>
        <location>classpath:doc/migration/common</location>
        <location>classpath:db/migration</location>
    </locations>
    <encoding>utf-8</encoding>
    <target>1.0</target>
    <outOfOrder>true</outOfOrder>
    <validateOnMigrate>true</validateOnMigrate>
    <baselineOnMigrate>true</baselineOnMigrate>
    <baselineVersion>1.0</baselineVersion>
    <baselineDescription>Let's go!</baselineDescription>
</configuration>
❸ 執行 Migration(-X 查看完整紀錄)
mvn flyway:migrate -X
❹ 運行結果(附上分段截圖)
Maven 執行,Flyway 讀取 Migration 檔案中

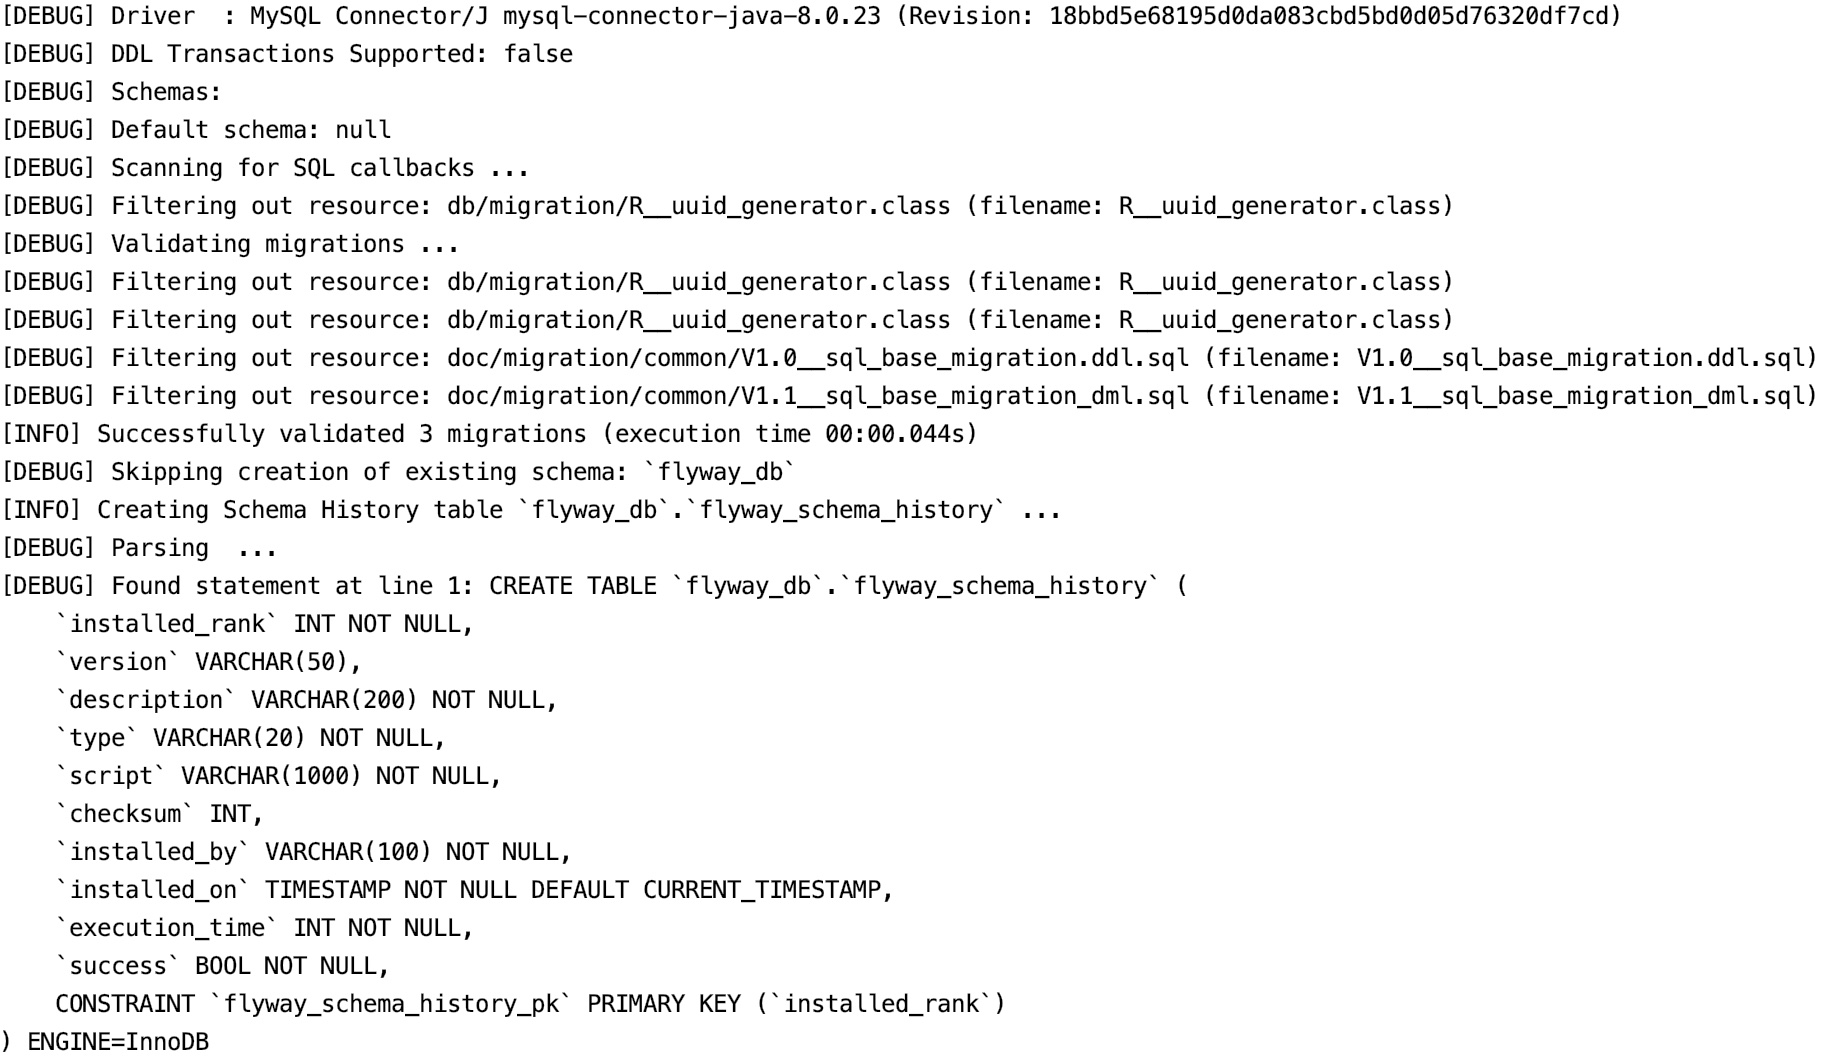
Flyway 的 Migration 檔案驗證通過後,會開始執行 Migration

查看資料庫,確認 DDL & DML 確實執行完畢
瞭解上述的運作原理及實作方式,另外可依據專案需求自行決定以下執行 Migration 的方式
❶ Command-line tool
Linux / Docker / Windows /Mac OS 皆有支援。
❷ Gradle
支援 Gradle 3.x, Gradle 4.x, Gradle 5.x, and Gradle 6.x 可運行在 Java 8, Java 9, Java 10, Java 11 or Java 12.
既有系統如何導入 Flyway ?
前面的情境都是以資料庫初始化的狀態說明,那如果既有系統也想導入呢? 以下列出四個步驟
❶ 備份 DML 以及 匯出 DDL。
❷ 先在本地端實際運行一次 Migration,執行 DML&DDL。
❸ 匯出上一步驟寫入 flyway_schema_history 的資料。
❹ 連線至測試環境手動建立 flyway_schema_history 並匯入資料。
執行完上述步驟,Flyway 啟用後即不會再重複執行 DML & DDL,只會運行後續新增的版本。
總結
本篇文章整理出 Flyway 的實際案例,盡可能點出大部分的使用情境,從 Migration 觀念建立、搭配專案常使用的 Spring Boot、測試框架驗證、Flyway Maven Plugin 使用,以及既有系統的導入指引。
Flyway 本身有提供付費版本,在官方文件中皆以[Flyway Teams]標記標註,另外 Flyway 還提供了 Callback 功能,方便我們可以自行依據需求在 Migration 前執行一些動作,本篇文章介紹的 Migration 功能基本上就能應付大多數情境,而 Maven 的方式則可以搭配 CICD,相信能夠一定程度節省專案開發協作與交付的時間。
更多的細節,以下提供官方提供的文檔以及相關資訊作為參考。
References:
- Flyway 文件 https://flywaydb.org/documentation/
- Flyway Spring Boot: https://flywaydb.org/documentation/usage/plugins/springboot